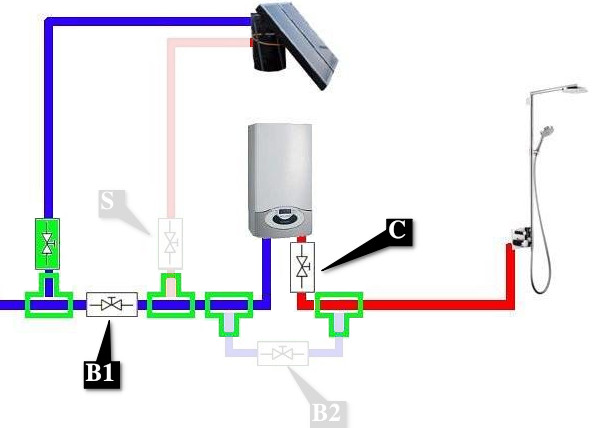
MiSolarCasero.com


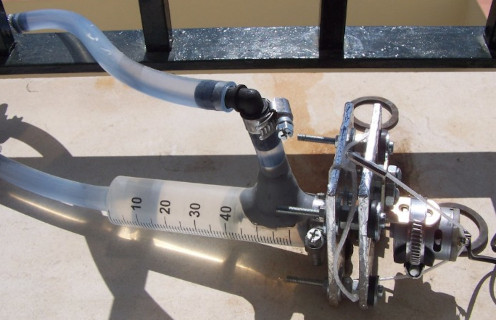
Me propuse hacer una bomba de agua centrífuga casera, y aquí tienes el resultado.
Submersible water pumps as a general rule, have little power.
If you want to use a submersible pump outside, you have to make a watertight body so that the pump can move the water.
And in short, it is the least suitable for recirculating water.
There are pumps online, that is, non-submersible, and reasonably priced, although they may not be within your reach.
However, most in-line pumps are not prepared to work with hot water.
Some in-line pumps work very well at first, but will break down after a short time.
In-line pumps usually have the motor inside the encapsulation through which the water circulates, this does not allow maintenance or change the motor in case of breakdown.
What usually happens with this type of water pump when we submit it to the circulation of hot water, is that there are internal expansions, and this ends up flooding the inside of the engine.
When this type of motor breaks down, the entire pump is unusable and irreparable, and we are forced to look for the same pump, or to look for a risky alternative.
or could also say
I thought that the centrifugal model was the most suitable for my use in hot water circulation.
Because also, due to their design, the water circulation and the motor can be in different places, and that inspires more confidence than the bulbs where the motor is inside everything.
So my homemade water pump will have the motor on the outside, that is clearer to me than the water :-D
The way I've built it, I can see it all in full swing.
I can replace anything in case of breakdown very quickly and easily.
It is designed to replace any of your few simple elements.
It is really inexpensive. For less than € 15. So easy and cheap that you can make a dozen without ruining yourself or going broke.
Ventajas al construirte tu propia bomba de agua centrífuga:
And without further ado we put on our gloves and get to the topic.
For the engine and its mounts
Material
Where to buy it
Price
Small electric motor
Electronic shop
3€
2 "L" type brackets
Any hardware store or Chinese bazaar stores
0,75€
1 Large clamp to fix the motor to the brackets
Any hardware store or Chinese bazaar stores
0,45€
For the motor body (syringe) and its supports
Material
Where to buy it
Price
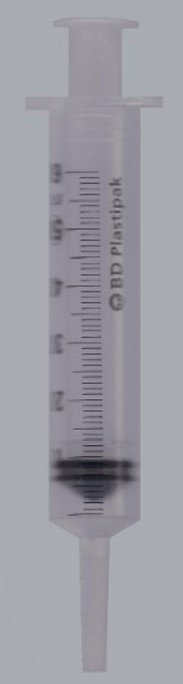
50ml large syringe
Any Pharmacy
1,80€
Epoxy Glue
Any hardware store or Chinese bazaar stores
2€
Epoxy repair putty
Any hardware store or Chinese bazaar stores
2€
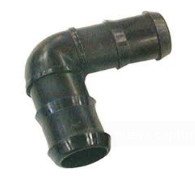
2 x 12mm polyethylene elbows (usually like black plastic)
Any Plumbing
0,50€
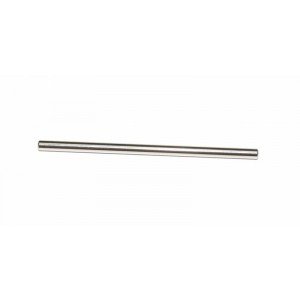
Stainless steel shaft (usually sold with gears)
Electronic shop
0,25€
1 piece of vinyl tubing, or similar, that will not melt or deteriorate with very hot water
Cualquier Ferretería o Fontanería
0€
Handy piece of plastic, for example an electrical register box. (To make our own rotor)
Any hardware store or Chinese bazaar stores
0€
For the casing
(Here I cannot assess prices because I already had this material, although the cost of this type of material is ridiculous)
Material
Where to buy it
Price
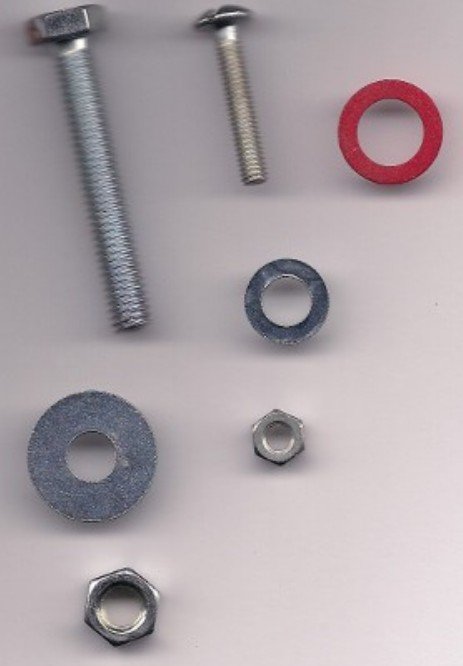
4 large screws
Any Hardware Store
0€
18 Large washers
Any Hardware Store
0€
4 large nuts
Any Hardware Store
0€
4 small screws
Any Hardware Store
0€
11 Small washers
Any Hardware Store
0€
4 small nuts
Any Hardware Store
0€
4 gaskets that fit the large screws (optional)
Any Hardware or Plumbing
0€
Marquetry wood or metal sheet (20mmx16mm)
Any Carpentry
0€
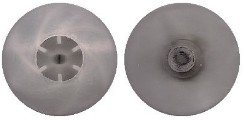
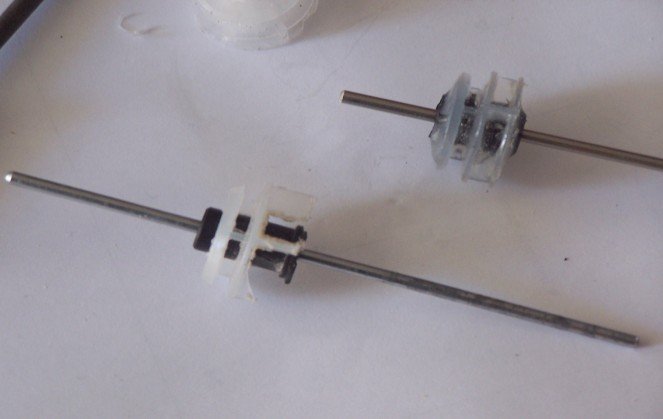
The rotor is the most important part of the pump, it is of little use to have a good motor if the rotor does not move the water well.
The rotor has to be of the centrifugal design, otherwise it will not be a centrifugal pump.
You can also put some shovels from a toy boat or something like that, but it will not be centrifugal and it will not be adequate.
This is the rotor that I have used, I have taken it from an old centrifugal pump:
To do this, you only need a few pieces of plastic, of uniform thickness, a fret saw, and a little patience.
Cut between 2 thin and flat bases of the same size in the shape of a circle, with a diameter equivalent to the thickness of the syringe (the larger the more power but the greater the risk of rubbing the syringe and damaging it, the smaller the easier it is to place it in the center syringe but less power)
It is very important that each of the 2 bases have a minimum thickness, between approximately 2 to 4mm.
Think that the bases will each have a hole in their center, and in those it will go through the axis.
If the bases are very thin, these holes may be deformed, or may not grip the shaft firmly.
Now, inside between the 2 bases (as if it were the filling of the sandwich), we place the walls in the shape of spirals.
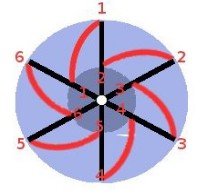
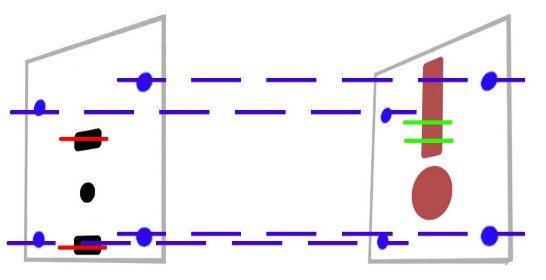
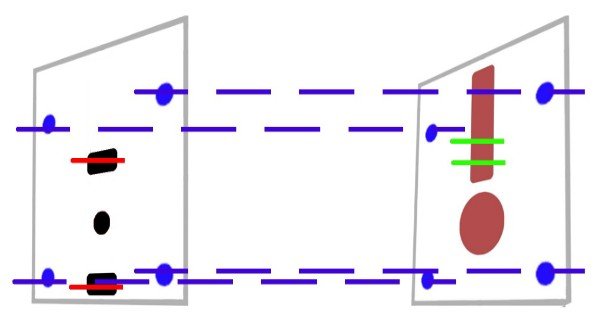
And the spirals should be shaped as such, and it is configured as follows.
As the drawing shows, we draw 3 imaginary axes (black lines).
The spirals (red lines) connect each line on the inside to the next line on the outside, look at the numbers.
This trick is important, because it is the way to respect the measurements, otherwise you may get a rare lettuce.
We glue the spirals to the circular base with epoxy glue, and cover the ceiling base.
Finally with the drill and delicately, we make a little hole right in the center.
The hole will be the size of your shaft.
All water pumps use a special seal called an O-ring, which is what allows the shaft to rotate in a waterproof way without water passing through it.
But sometimes this type of gasket is difficult to find.
I propose something that is available to everyone, is effective, and is inexpensive.
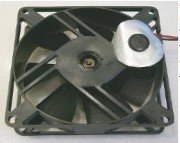
Remove the sealed bearing from a computer fan
A computer fan can be found in any computer store at a very low price, between 2 to 4 euros.
Buy the cheapest.
The bearing that we will find in these mini fans, can be of the type bearings, normally it will be like this.
The fan that uses bearing bearings is distinguished because they are like 2 cylinders one inside the other, or just a metal body with the hole, the first one rotates much better, but the 2 are valid for our purpose.
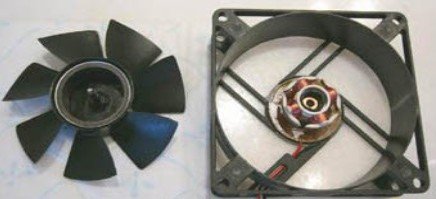
You will see the bearing in the center inside a plastic cylinder.
This cylinder is glued to another outer metal cylinder.
Pry between the 2 until you can remove the inner cylinder with pliers.
You can test the tightness by blowing or sucking the cylinder with the shaft inserted.
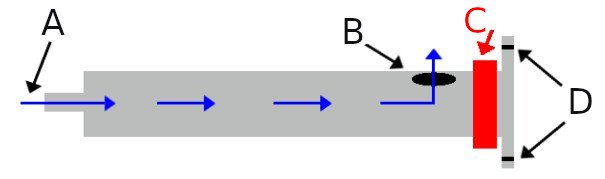
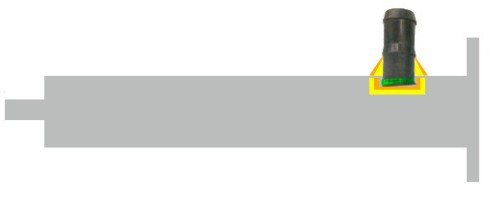
We are going to modify the syringe so that it is able to move the water in a watertight manner, and that it has an inlet and an outlet.
In the 12mm hole, we will put the polyethylene elbow, to be able to attach a tube to this part of the syringe to drain the water.
The water inlet is already implicit in the syringe tip (where the needle is attached)
To put the elbow here, we have to cut it in half, because we do not want an elbow, but a mouthpiece.
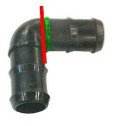
Cut where the red line indicates.
We have to take advantage of the area that I have painted green, which is like a spring to help hold the tubes.
I use this spring as a base to stick it inside the syringe.
And we paste it as seen in the following drawing ...
What is painted yellow represents Epoxy glue, it is applied inside and out.
Epoxy glue sticks and seals.
It dries completely in 24 hours, although the manufacturer says it dries in a few hours, it is better to wait.
What is painted orange, represents the Epoxy repair putty, the kind that is sold in everything at a hundred, the typical 2-color plaster, which mixes and hardens.
It is also advisable to let it dry for 24 hours.
With the putty what I get, is more sealed, and hardens the joint, so that it resists the sticking in case of giving it some impact or accidental twisting.
While the assembly dries, we are going to prepare the shaft pin, the part that acts as a plug, where the shaft passes through the syringe, rotates, and is sealed.
We cut the part of the piston of the syringe, it is the widest part that pushes the liquid from the syringes and that is covered with a large black rubber.
In this we make the hole the size of the bearing set that we previously removed from the pc fan.
The hole in the piston has to be as centered and straight as possible, if we don't get it right then the pump will have a lot of vibrations.
The sealing rubber is not really going to stagnate much, because it will be bored to go through the shaft, but it will be the perfect fit for the piston inside the syringe without moving.
The sealing is made by the bearing, and the O-ring that we will put on it.
It has to be as in the photo: (I have put it with the box so that it is more clearly seen)
The idea is this:

Green: The piston with its rubber.
Orange: The hole and the bearing stuck.
Tiny Blue: Gasket or O-rings
The gasket or o-rings, depends on the size and shape of everything, you may need 1 gasket, 2 or 3 ... depending on how you see the filling of the hole, the quality of the bearing and the sealing.
Of course, the O-rings are always on the outside of the syringe, so they can be handled or changed if they break.
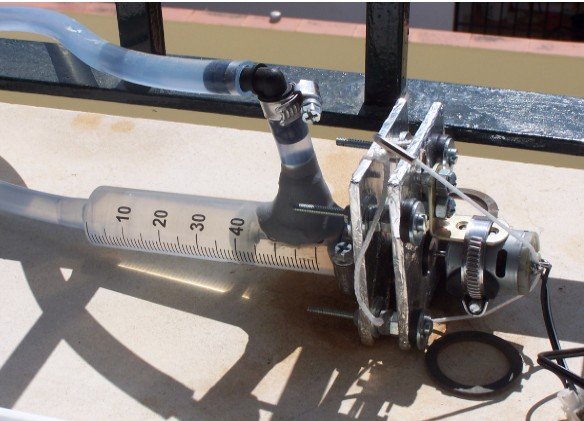
Así queda finalmente la jeringa con todo su montaje, pero todavía sin la abrazadera que bloquea el tapón de goma:
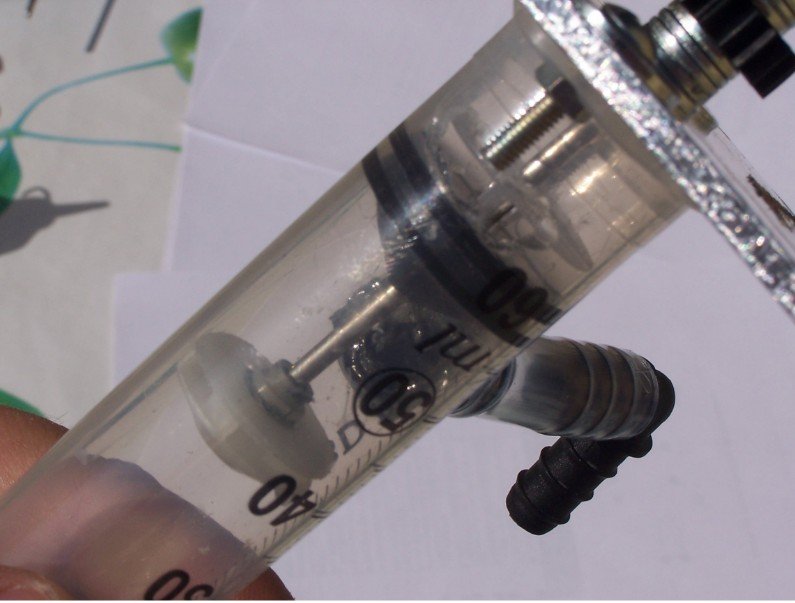
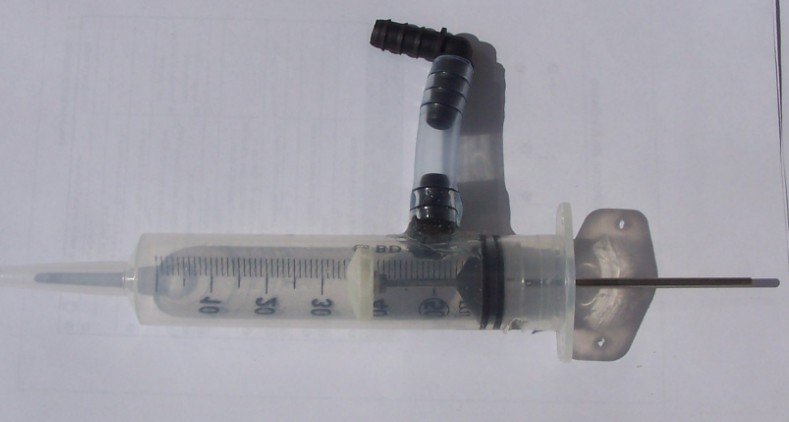
The piston with its large black rubber is what makes the internal clamping.
So that this rubber is locked in position and inclination, and the centrifugal force does not suck it, we have to put a metal clamp on the outside and tighten it well.
We will see the clamp placed at the end of the whole.
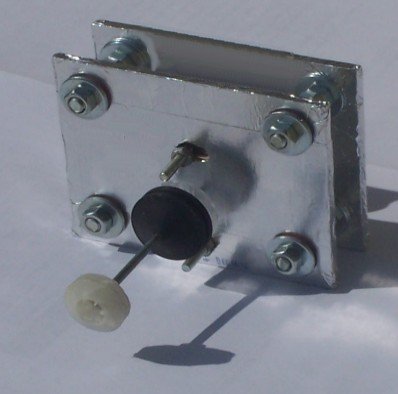
Build the body of the box.
The box will be the one that encloses the whole mechanism and will interconnect the rotor and the motor separately.
We will make this box with marquetry wood.
I chose this wood that, in addition to being resistant, is very manipulable, however, if you want to make it out of plastic or sheet metal, any option is valid.
The difference will be mainly the difficulty of work when handling it.
We will cut 2 small boards, each one measuring 10mm wide and 8mm high.
And we will work both tables as indicated by the drawing mold, and I will explain the meaning of each color below:
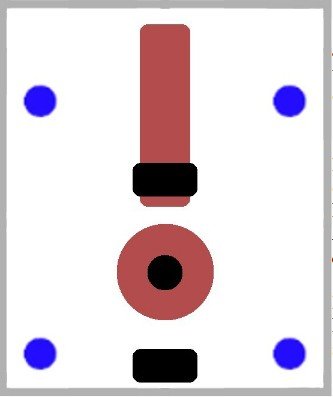
If your syringe matches this size, you can print this template and use it on the woods
We will join the 2 boards and with a drill and drill (drill bit the size of the large screw) we will make the holes for the blue circles, crossing the 2 woods.
In the front wood we drill the black marks, with a bit the size of the small-fine screw, to make that horizontal shape you can make several holes.
Note that the measurement of both (4 cm) coincide with the grip of your syringe.
We drill the brown color in the back wood, it will be the hole for the motor and the guide-rail for the "Ele" that will hold and adjust the height of the motor.
The front table contains:
The back table contains:
Observations on the box.
If these wooden boards are going to live with humidity, or in the open, it is advisable to protect it with some varnish, or something that covers it.
I have covered it with aluminum duct tape
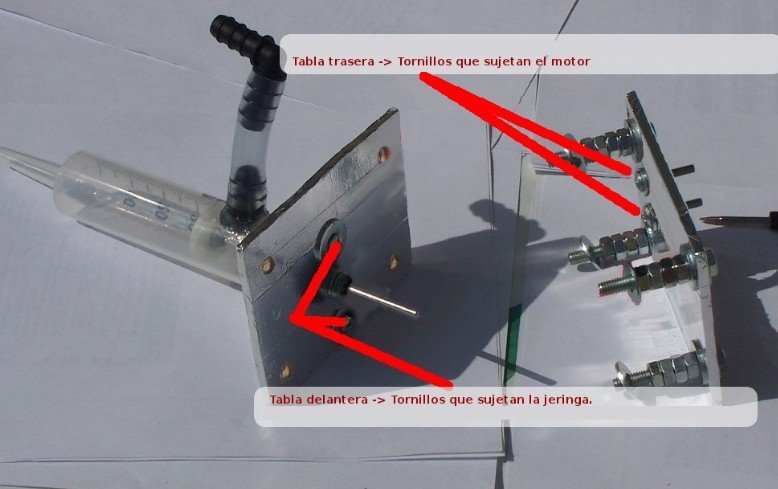
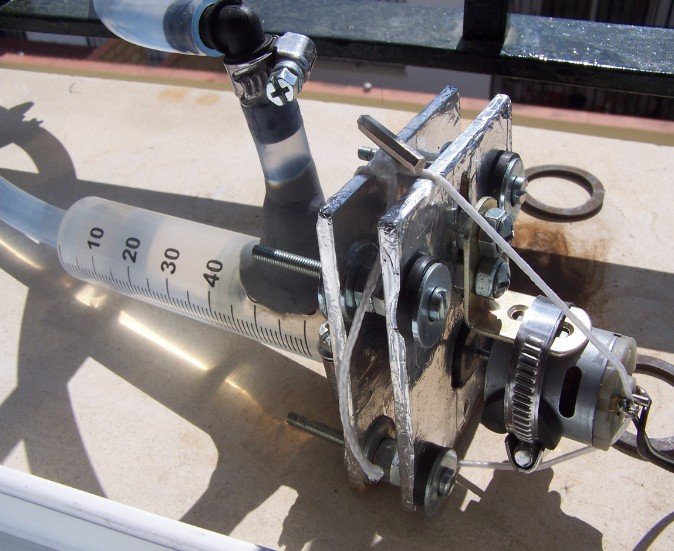
The electric motor goes in the back of the box.
An "Ele" (in the Cyan color drawing) with a clamp (in the Yellow drawing) will be the body and support of our little motor (in the Black drawing), which at the same time will be screwed into the box (green stripes).
The rail-shaped hole where the aforementioned "Ele" is attached has that shape to allow the "Ele" to be raised or lowered to adapt the height according to the diameter of the little motor.

Special attention when we tighten the clamp, because we can very easily burst the cylindrical magnet inside the motor.
The orange piece that joins both shafts (syringe-motor) can be made of wood or plastic.
It is important that it has a large body, in such a way that if at any time the syringe leaks water, it will collide with this part, and never with the motor.
If at some point an axis does not grip this piece well, we can cut an aluminum strip from any soda can, and wrap this strip around and roll it on the axis in question, so that the strip is between the orange piece and the axis.
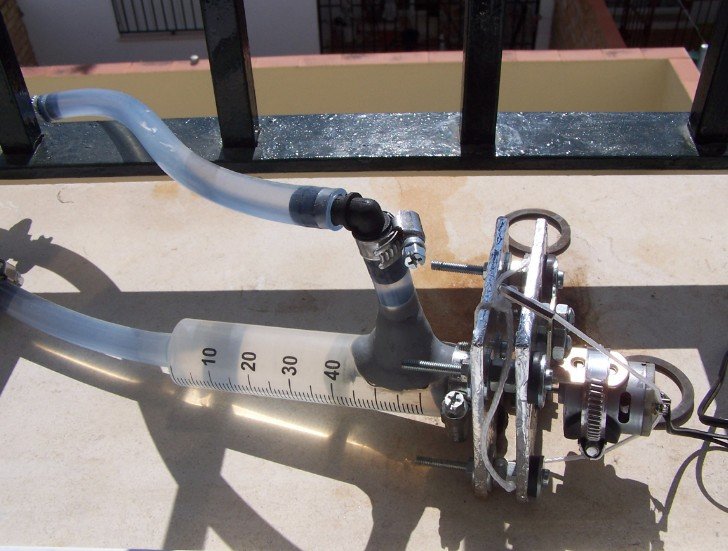
Performance can vary with many things, build quality, friction.
You can lubricate the shaft in the bearing part, being careful that the lubricant does not reach or wet the part that joins the 2 shafts, as they could slip and the transmission fail.
Performance can also be reduced or increased with the voltage applied to the motor, that is, the higher volts the faster the motor will go and vice versa.
In this setup, my time to fill a 1 Liter bottle with 12 volts is 8 seconds.